No Copy


No Right Click

Selamat Datang di Windows Macintosh Daily Life

Blog gratis yang menyajikan berita seputar Microsoft windows dan macintosh.

Microsoft Windows 10

Berita seputar Microsoft Windows 10. Membahas berbagai informasi mengenai Microsoft windows terbaru.

Apple OSX

Artikel yang membahas tentang OSX terbaru dari Apple tentu sangat menarik untuk dibaca. Tak kalah serunya jika kita paham mengenai tips dan trik yang ada didalamnya.

Back Packer and Travelling

Salah satu aktifitas yang sangat seru dan menyenangkan mungkin back packer dan travelling. Disini kita akan berbagi pengalaman tentang mengunjungi suatu tempat yang asik yang ada di bumi ini.

Photography

Photography asik dan menarik jika kita mengetahuinya lebih dalam. Disini kita bisa melihat berbagai hal dari sudut pandang photo. Menarik untuk dipahami.

Monday, December 5, 2016

Android Apps Terbaik Untuk Muslim - November 2016

Seiring dengan perkembangan teknologi perangkat smartphone yang dari hari ke hari mengalami pertumbuhan pesat tentu diiringi dengan aplikasi-aplikasi Android menarik dan berguna untuk berbagai aktifitas yang dilakukan manusia di muka bumi.

Pada kesempatan ini, kita akan membahas aplikasi Android untuk sahabat muslim di Indonesia. Aplikasi ini merupakan aplikasi yang sangat bermanfaat dan melalui aplikasi ini kita bisa belajar islam lebih dalam lagi. Aplikasi-aplikasi ini sangat beragam dari mulai Al Qur'an, Hadist, Doa dan Dzikir, Radio Islam, Berita Islam, Tafsir Qur'an, Dakwah para ulama dan lain sebagainya.

Muslim Pro


 Aplikasi yang paling populer, Diakui oleh lebih dari 30 juta umat Islam di seluruh dunia sebagai waktu sholat paling akurat & aplikasi azan, Pro Muslim juga memiliki fitur Quran penuh dengan script Arab, fonetik, terjemahan dan tilawah audio serta locator Qibla, kalender Islam Hijriah, sebuah peta halal restoran dan Masjid, dll ...


FITUR UTAMA:
• waktu shalat akurat berdasarkan lokasi Anda saat ini dengan beberapa pengaturan yang tersedia (sudut) 
• Azan: pemberitahuan visual dan audio untuk panggilan untuk berdoa dengan banyak suara muadzin untuk memilih dari 
• Puasa kali (Imsak dan buka puasa) selama bulan Ramadhan 
• Access waktu shalat langsung dari menu Hari perangkat (iOS8 dan iOS9 saja) 
• The Holy Quran (Al Qur'an) dengan tilawah audio (mp3), fonetik dan terjemahan 
• "Tasbih" untuk menghitung dzikir Anda 
• Halal restoran dan lokasi masjid sekitar Anda 
• animasi kiblat kompas dan peta menunjukkan arah ke Mekah 
• Lengkap kalender Islam Hijriah untuk memperkirakan tanggal suci seperti Idul Fitri dan Idul Adha 
• 99 nama Allah 
• kartu ucapan Islam indah (Eid Mubarak, Ramadan Kareem , dll ...) 
• Hisn'ul Muslim (Fortress of Muslim): koleksi doas dan permohonan) 
• App dan Quran sepenuhnya diterjemahkan ke: Bahasa Indonesia, Bahasa Melayu, Deutsch, English.
Untuk download Muslim Pro silahkan cek disini
Aplikasi lainya yang Inshaa Allah bermanfaat adalah sebagai berikut:
  • Berita Islam -- Kumpulan berita dari situs-situs islam Indonesia.
  • Hadist Bukhari.
  • Hadist Muslim.
  • Hadist Arbain.
  • Tafsir Qur'an Ibnu Katsir.
  • Do'a an Dzikir Pagi dan Petang.
  • Salaam -- Berisi Al Qur'an, Panduan Shalat dan Haji. 
  • Ensiklopedia 9 Hadist -- Berisi 9 hadist. 
  • Tanya Ustadz

Aplikasi-aplikasi tersebut diatas bagus dan bermanfaat silahkan di cek langsung di Google Play.


Thursday, December 1, 2016

Fasboot EDL Versi 2 Donwnload Gratis - Unlock Fastboot Xiaomi Hand Phone

Tampilan Reboot EDL di CMD windows.
Fasboot EDL versi 2 ini adalah script command file yang sederhana untuk membuka kunci jika kita ingin melakukan transfer MIUI Rom dari Laptop/PC ke HP Xiaomi. Script ini dijalankan sebelum kita menggunakan MiFlash. Jadi fungsinya hanya sebagai pembuka kunci pada saat HP Xiaomi di mode fastboot. Seperti yang kita tahu untuk masuk ke menu fastboot, kita harus mematikan HPnya kemudian setelah mati, hidupkan dengan menekan tombol volume - dan power secara bersamaan, maka otomatis xiaomi kamu akan masuk ke menu fastboot tersebut.

Fastboot EDL Versi sebelumnya kita harus mengetikkan instruksi di baris command yang ada di cmd windows.... dengan Fastboot EDL versi 2 ini kita tinggal mendouble klik file reboot.bat secara langsung HP Xiaomi akan mati dan unlock serta siap untuk mentransfer MIUI rom yang anda inginkan. -- Sangat simple.

Redmi Note 3 sudah mendukung untuk EDL didalam Android Bootloader module, tetapi fastboot utility tidak menyarankan "reboot-edl" di dalam command line dan merejek to mengirimkan perintah kepada device.  Sejak Fastboot command protocol adalah sederhana dan berbasis text, ini sudah cukup untuk mengirimkan paket yang berisikan "reboot-edl" text melalui USB port. Jalan ini sangat simple unutk melakukan patch Windows fastboot.exe file, menggantikan "reboot-bootloader" text dengan "reboot-edl". 

Berikut ini link script untuk fastboot EDL versi 2, lebih simple tak perlu lagi mengetik perintah text di jendela cmd. 


New Update: Fastboot updated to latest version.


Tutorial: 
1. Download the Fastboot_edl-v2.zip from Here.
2. Extract the zip in your desktop
3. Open the folder and double Click on Reboot.bat
4. Reboot your device to Fastboot Mode by pressing
Vol Down + Power button and connect your device with PC and Press Enter.
5. Your Device will be rebooted to EDL!
6. Now flash your Fastboot Rom with Mi Flash Tool to Unbrick your Mi Note 3. 

ROM MIUI Xiaomi untuk Release November 2016 - Semua Type Xiaomi [OFFICIAL ROM MIUI}

Apa kelebihan MIUI 8 ini?


Berikut ini links untuk ROM MIUI Xiaomi untuk Release November 2016


Silahkan cek type handphone Xiaomi yang kamu punya kemudian download ROM MIUI dibawah ini:


Xiaomi Mi 1/1S Latest Developer Version Fastboot File Download
Xiaomi Mi 1/1S Latest Stable Version Fastboot File Download
Xiaomi Mi 2/2S Latest Developer Version Fastboot File Download
Xiaomi Mi2/2S Latest Special Edition Fastboot File Download
Xiaomi Mi 2/2S Latest Stable Version Fastboot File Download
Xiaomi Mi 2A Latest Developer Version Fastboot File Download
Xiaomi Mi 2A Latest Special Editon Fastboot File Download
Xiaomi Mi 2A Latest Stable Version Fastboot File Download
Xiaomi Mi 3 CDMA/WCDMA Lastest China Developer Version Fastboot File Download
Xiaomi Mi 3 CDMA/WCDMA Lastest Global Developer Version Fastboot File Download
Xiaomi Mi 3 CDMA/WCDMA Latest China Stable Version Fastboot File Download
Xiaomi Mi 3 CDMA/WCDMA Latest Global Stable Version Fastboot File Download
Xiaomi Mi 4 CDMA/WCDMA/LTE Latest China Developer Version Fastboot File Download
Xiaomi Mi 4 CDMA/WCDMA/LTE Latest Global Developer Version Fastboot File Download
Xiaomi Mi 4 CDMA/WCDMA/LTE Latest China Stable Version Fastboot File Download
Xiaomi Mi 4 CDMA/WCDMA/LTE Latest Global Stable Version Fastboot File Download
Xiaomi Mi 4S Latest China Developer Version Fastboot File Download
Xiaomi Mi 4S Latest China Stable Version Fastboot File Download
Xiaomi Mi 4i Latest China Developer Version Fastboot File Download
Xiaomi Mi 4i Latest Global Developer Version Fastboot File Download
Xiaomi Mi 4i Latest China Stable Version Fastboot File Download
Xiaomi Mi 4i Latest Global Stable Version Fastboot File Download
Xiaomi Mi 4c Latest China Developer Version Fastboot File Download
Xiaomi Mi 4c Latest China Stable Version Fastboot File Download
Xiaomi Mi 5 Latest China Developer Version Fastboot File Download
Xiaomi Mi 5 Latest China Stable Version Fastboot File Download
Xiaomi Mi 5 Latest Global Developer Version Fastboot File Download
Xiaomi Mi 5 Latest Global Stable Version Fastboot File Download
Xiaomi Mi 5s Latest China Developer Version Fastboot File Download
Xiaomi Mi 5s Latest China Stable Version Fastboot File Download
Xiaomi Mi 5s Plus Latest China Developer Version Fastboot File Download
Xiaomi Mi 5s Plus Latest China Stable Version Fastboot File Download
Xiaomi Mi 5s Plus Latest Global Stable Version Fastboot File Download
Xiaomi Mi Note Latest China Developer Version Fastboot File Download
Xiaomi Mi Note Latest Global Developer Version Fastboot File Download
Xiaomi Mi Note Latest China Stable Version Fastboot File Download
Xiaomi Mi Note Latest Global Stable Version Fastboot File Download
Xiaomi Mi Note Pro Latest Developer Version Fastboot File Download
Xiaomi Mi Note Pro Latest Stable Version Fastboot File Download
Xiaomi Mi Max 32GB Latest China Developer Fastboot File Download
Xiaomi Mi Max 32GB Latest China Stable Version Fastboot File Download
Xiaomi Mi Max 32GB Latest Global Developer Version Fastboot File Download
Xiaomi Mi Max 32GB Latest Global Stable Version Fastboot File Download
Xiaomi Mi Max Prime 64G/128G Latest China Developer Version Fastboot File Download
Xiaomi Mi Max Prime 64G/128G Latest China Stable Version Fastboot File Download
Xiaomi Mi Max Prime 64G/128G Latest Global Stable Version Fastboot File Download
Xiaomi Mi Note 2 Latest China Developer Version Fastboot File Download
Xiaomi Mi MIX Latest China Developer Version Fastboot File Download
Xiaomi Mi Pad Latest China Developer Version Fastboot File Download
Xiaomi Mi Pad Latest China Stable Version Fastboot File Download
Xiaomi Mi Pad Latest Global Stable Version Fastboot File Download
Xiaomi Mi Pad 2 Latest China Developer Version Fastboot File Download
Xiaomi Mi Pad 2 Latest China Stable Version Fastboot File Download
Redmi 1S Latest China Developer Version Fastboot File Download
Redmi 1S Latest Global Developer Version Fastboot File Download
Redmi 1S Latest China Stable Version Fastboot File Download
Redmi 1S Latest Global Stable Version Fastboot File Download
Redmi Note 4G Latest China Developer Version Fastboot File Download
Redmi Note 4G Latest Global Developer Version Fastboot File Download
Redmi Note 4G Latest China Stable Version Fastboot File Download
Redmi Note 4G Latest Global Stable Version Fastboot File Download
Redmi Note Prime (4G Dual-SIM) Latest China Developer Version Fastboot File Download
Redmi Note Prime (4G Dual-SIM) Latest China Stable Version Fastboot File Download
Redmi Note Prime Latest Global Stable Version Fastboot File Download
Redmi Note Prime Latest Global Developer Version Fastboot File Download
Redmi Note 2 Latest China Developer Version Fastboot File Download
Redmi Note 2 Latest Global Stable Version Fastboot File Download
Redmi Note 2 Latest Global Developer Version Fastboot File Download
Redmi Note 2 Latest China Stable Version Fastboot File Download
Redmi Note 3 MTK Latest China Developer Version Fastboot File Download
Redmi Note 3 MTK Latest China Stable Version Fastboot File Download
Redmi Note 3 Qualcomm Latest China Developer Version Fastboot File Download 
Redmi Note 3 Qualcomm Latest China Stable Version Fastboot File Download
Redmi Note 3 Qualcomm Latest Global Developer Version Fastboot File Download
Redmi Note 3 Qualcomm Latest Global Stable Version Fastboot File Download
Redmi Note 3 Special Edition Latest Global Developer Version Fastboot File Download
Redmi Note 3 Special Edition Latest Global Stable Version Fastboot File Download
Redmi Note 4 Latest China Developer Version Fastboot File Download 
Redmi Note 4 Latest China Stable Version Fastboot File Download
Redmi Note 4 MTK Latest Global Stable Version Fastboot File Download
Redmi 2 Latest China Developer Version Fastboot File Download
Redmi 2 Latest Global Developer Version Fastboot File Download
Redmi 2 Latest China Stable Version Fastboot File Download
Redmi 2 Latest Global Stable Version Fastboot File Download
Redmi 2 Prime Latest China Developer Version Fastboot File Download
Redmi 2 Prime Latest Global Developer Version Fastboot File Download
Redmi 2 Prime Latest China Stable Version Fastboot File Download
Redmi 2 Prime Latest Global Stable Version Fastboot File Download
Redmi 3/Prime Latest Global Developer Version Fastboot File Download
Redmi 3/Prime Latest China Developer Version Fastboot File Download
Redmi 3/Prime Latest Global Stable Version Fastboot File Download
Redmi 3/Prime Latest China Stable Version Fastboot File Download
Redmi 3S/Prime/3X Latest China Developer Version Fastboot File Download
Redmi 3S/Prime/3X Latest China Stable Version Fastboot File Download
Redmi 3S/Prime Latest Global Developer Version Fastboot File Download
Redmi 3S/Prime Latest Global Stable Version Fastboot File Download
Redmi Pro Latest China Developer Version Fastboot File Download
Redmi Pro Latest China Stable Version Fastboot File Download
Redmi 4 Latest China Developer Version Fastboot File Download
Redmi 4 Latest China Stable Version Fastboot File Download
Redmi 4A Latest China Developer Version Fastboot File Download
Redmi 4A Latest China Stable Version Fastboot File Download
Redmi 4 Prime Latest China Developer Version Fastboot File Download
Redmi 4 Prime Latest China Stable Version Fastboot File Download
(Please check if the ROM file suffix is '.tgz'. If it is '.gz', please rename it to '.tgz')

Untuk metode dan cara flashing ROM XIAOMI silahkan baca link dibawah ini:

http://en.miui.com/a-232.html

Ada 3 cara metode yang digunakan untuk flashing ini.

Monday, November 28, 2016

Xiaomi Semua Tipe - Bagaimana Cara Backup dan Restore (Local Mode di HP)

Bagi anda pengguna smartphone Xiaomi, pasti ada kalanya anda akan mengupdate/ upgrade MUI ke versi terbaru, karena memang developer ROM MIUI ini sering melakukan update. Sebelum anda melakukan update/ upgrade, alangkah baiknya anda membackup dahulu semua data ponsel karena biasanya proses update ini akan menghapus semua data dan aplikasi di ponsel. Terutama jika anda melakukan update lewat Mi Flash Tool, maka aplikasi yang sebelumnya sudah terinstall akan terhapus.
Cara backup maupun restore pada smartphone Xiaomi ini bisa dilakukan langsung dari ponsel itu sendiri. Anda tidak perlu bantuan PC, tanpa harus lewat Mi PC Suite, anda bisa membackup data data penting ponsel langsung dari HP. Tapi untuk memudahkan transfer data backup lebih bagus lagi kalau anda menggunakan PC/ laptop. Tapi tidak wajib kok untuk menggunakan PC/ laptop.
Langsung saja, berikut ini adalah tutorial backup dan restore data maupun aplikasi pada ponsel Xiaomi. Bisa dilakukan pada ponsel Xiaomi jenis apapun, mau Xiaomi Redmi 1s, Redmi Note, Redmi Note 2, Xiaomi Mi 4i, Xiaomi Redmi 3, dan ponsel Xiaomi yang lain. Tapi yang jelas backup dan restore ini bisa dilakukan antar sesama ROM berbasis MIUI.
Yang pertama adalah proses backup data aplikasi ponsel Xiaomi.
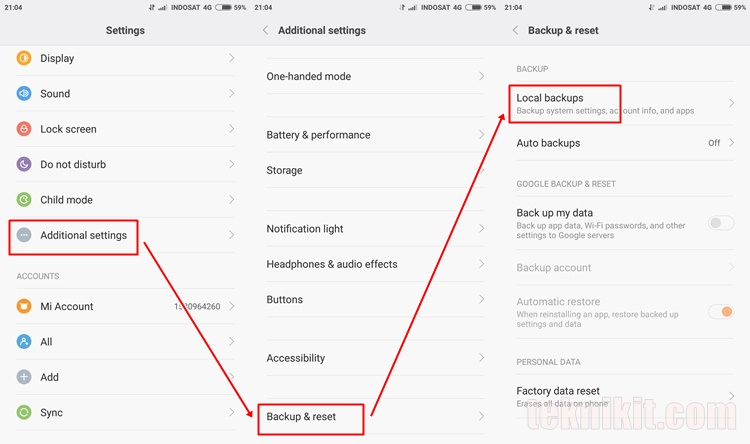
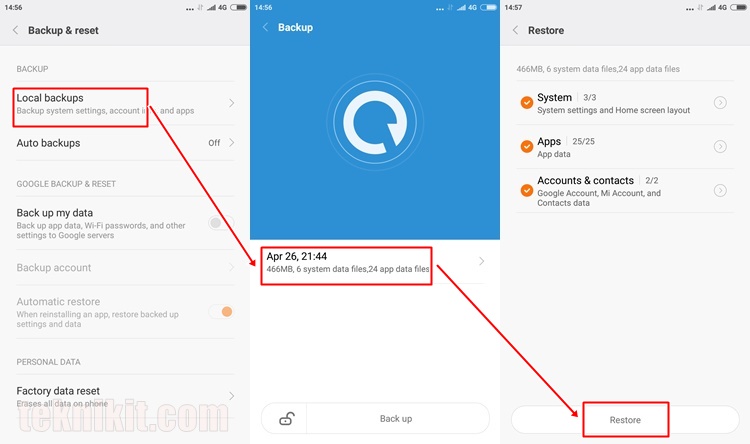
1. Masuk ke menu Settings >> Additional settings >> Backup & reset >> Local backups


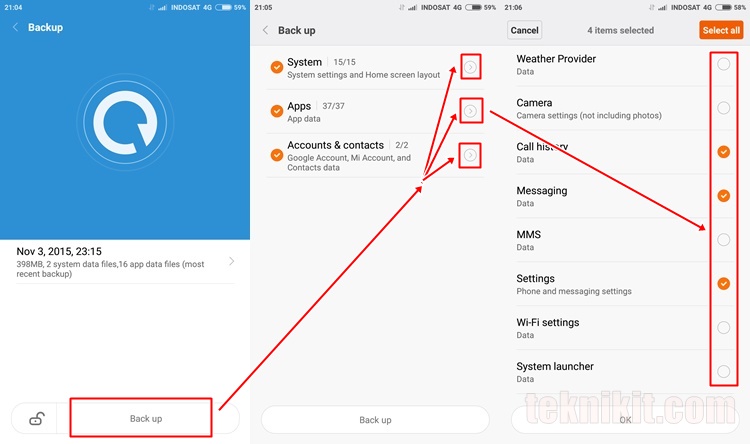
2. Selanjutnya pilih Backup, kemudian di situ ada 3 menu backup, SystemApps, dan Accounts & contacts. Secara default ketiga menu tersebut akan memilih semua backup. Namun anda juga bisa memilih sendiri data mana saja yang perlu dibackup, tidak perlu semuanya dibackup. Caranya dengan mengklik tanda panah pada masing masing menu, kemudian anda centang aplikasi mana saja yang perlu dibackup.


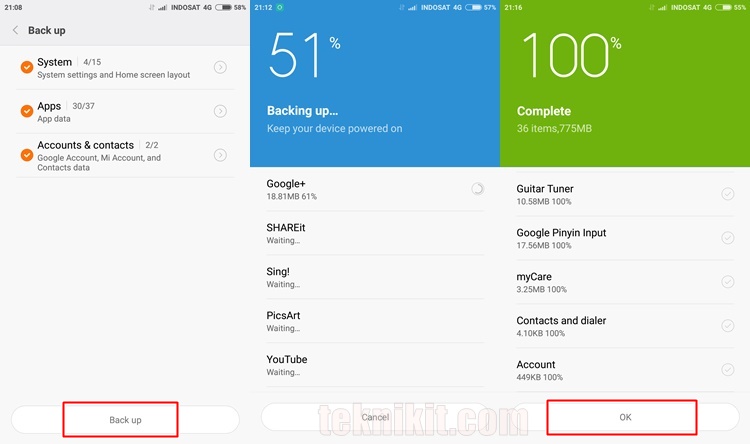
3. Jika anda sudah menentukan data dan aplikasi apa saja yang mau dibackup, tinggal klik OK >> Backup. Maka proses backup akan berjalan, tunggu sampai proses selesai baru pilih OK.


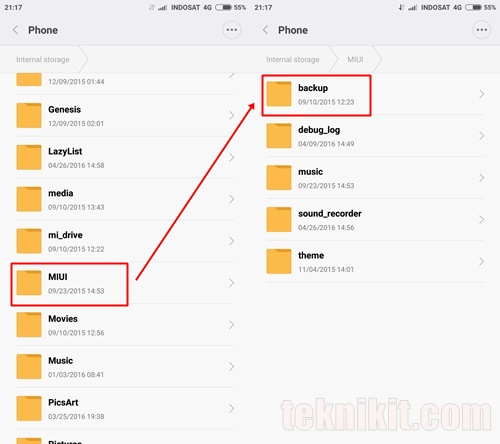
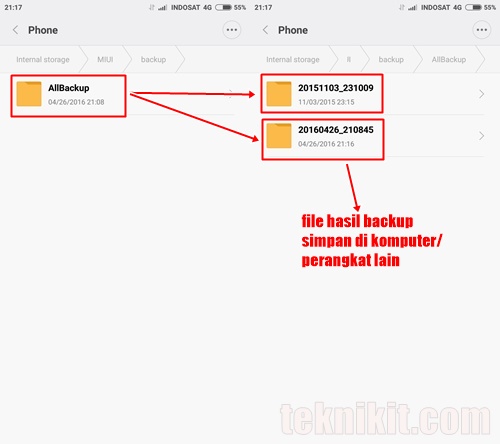
4. Jika proses backup sudah selesai, maka file backup tadi akan disimpan di internal memory ponsel Xiaomi. File backup ini berada di folder MIUI >> backup >> AllBackup


5. Agar lebih aman lagi, untuk jaga jaga, sebaiknya file/ folder hasil backup tersebut anda salin ke PC/ laptop, atau bisa juga ke perangkat lain. Karena beberapa proses update terutama yang menggunakan Mi Flash Tool (proses flashing) ini akan menghapus semua data yang berada di internal memory HP.
Oke, setelah anda backup data data penting ponsel, lantas bagaimana cara merestore kembali data tersebut ke ponsel Xiaomi? Jadi, setelah anda melakukan update ROM Xiaomi, atau melakukan flashing ulang, cek kembali folder backup masih ada apa tidak. Jika ternyata folder backup tersebut terhapus, maka anda masih punya salinan file backup. Salin lagi file backup tadi ke internal memory, dan berikut adalah cara restore data aplikasi smartphone Xiaomi.
1. Sama seperti proses backup, masuk ke Settings >> Additional settings >> Backup & reset


2. Pilih Local backups >> pilih file backup >> Restore


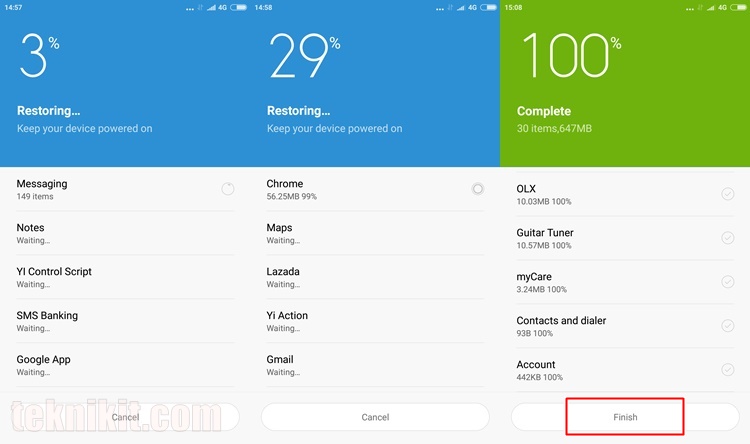
3. Maka proses restore semua data dan aplikasi hasil backup anda akan berlangsung, tunggu hingga proses selesai 100%.


Oke, setelah ini maka semua data data maupun aplikasi anda akan terinstall kembali pada ponsel Xiaomi seperti yang anda inginkan.
Saran! Untuk backup kontak telepon, sebaiknya anda backup juga ke Google Account atau ke Mi Account agar lebih aman. Sebab beberapa pengguna mengalami walau sudah backup kontak lewat cara di atas namun ketika direstore ada beberapa kontak yang tidak muncul.

Sumber: http://teknikit.com/2016/05/cara-backup-restore-data-aplikasi-xiaomi.html 

Friday, November 18, 2016

Cara Mengganti Battery Macbook Pro 13"

Berikut ini tahapan untuk mengganti Battery Macbook Pro 13"

1. Siapkan obeng + dan obeng bermata khusus ukuran kecil
2. Buka cover belakang MBP. Ada 10 buah baut yang harus dilepaskan.
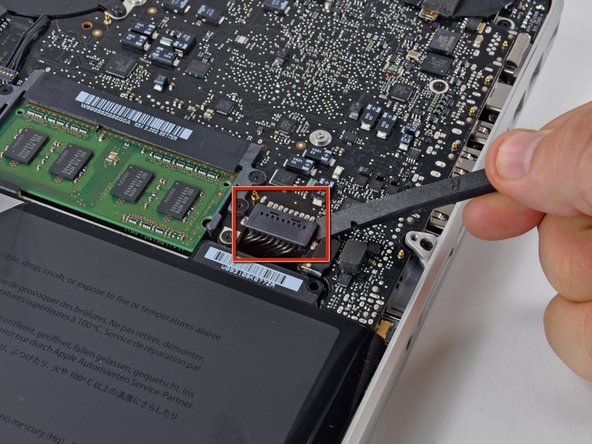
3. Lepaskan koneksi battery ke mainboard.
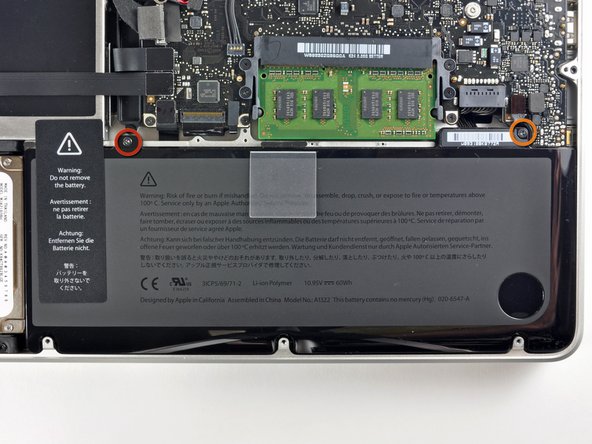
4. Buka 2 baut battery.
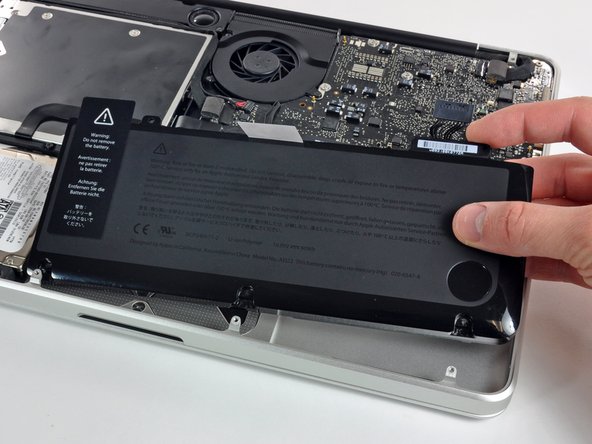
5. Lepaskan battery dan battery battery siap dipasang.

Image 1/1: Seven 3 mm Phillips screws.

Image 1/1:

Image 1/1: One 5.5 mm tri-wing screw.


Image 1/1:


Image 1/1:

Untuk lebih detailnya silahkan lihat video dibawah ini.


Wednesday, November 9, 2016

Bagaimana cara install MacOS Sierra dengan VMWare

Silahkan simak video di bawah ini.

How to install Mac OS Sierra 10.12 on a PC. Work with Intel and AMD cpu's. If have problem to run virtual machine enable virtualization in bios/uefi.


Silahkand download file yang dibutuhkan di bawah ini.

Configuration file command: smc.version = "0"

Get Vmware
http://www.vmware.com/

Get OS X Sierra
https://goo.gl/o0Ttr7 ( Updated version )

Get Tool's
https://goo.gl/d9Xp8M

Friday, October 21, 2016

Dr. Cleaner - Disk, Memory, System Optimizer dan Bandwidth+ - Network Speed Monitoring

Kali ini kita akan membahas 2 aplikasi ringan untuk pencinta Mac. Seperti judulnya kita akan membahas mengenai aplikasi yang ringan untuk dijalankan di Mac OS tetapi manfaat lumayan bagus dan GRATIS tentunya.

1. Dr. Cleaner 


--- 2,500,000 USERS in 18 MONTHS. 110,000 RATINGS, AVERAGE RATING 4.8 --- 
Dr. Cleaner is the ONLY all-in-one FREE App that offers Memory Optimization, Disk Cleaning and System Monitoring to keep your Mac optimized for the best performance.
With a brand new user interface, Dr. Cleaner provides an easy-to-use way to optimize the performance of your Mac! Also, with Dr. Cleaner, you can easily view real-time network usage and CPU usage in the menu bar.

USER COMMENTS
"It removes unwanted and useless files to clean up your mac. It does everything the description says." — Kamil.D from Australia
"Very simple - very effective. Easy to use and great way to keep your Mac optimised." — Damo1193 from U.K.
"Simply the best App I have ever used…" — Jani from Germany

PRIMARY FEATURES
[Smart Memory Optimizer]

• 1-click memory optimization
• Instantly reclaim memory from closed Apps
• Identify Apps that use a significant amount of memory

[Junk Files Cleaner]
• Quick disk clean from status bar menu
• Clean temporary files, incl. logs, mail caches, iTunes and iOS temporary files, etc.Empty Trash for current user
• Clever detection of remaining files after deleting Apps
• Clean trash in removable storage

[Big Files Scanner]

• 1-click scan of big files (customizable size from 10 MB and above)
• Multiple filters of size, date, name and type
• Local files in sync with your cloud drives can also be found
• Protected files* will not be deleted
[* Important big files can be "locked" into the protected list to avoid false deletion.]

[Duplicate Finder]
• Thorough and quick scan — it has the fast and accurate scanning technique that covers your entire home folder.
• Smart and accurate selection — duplicates are selected not only by file names but also by their contents. Files are shown in detailed previews. it can also help you "decide" which copy to delete by presenting "Auto Select" button.
• Easy and safe decision — duplicates can be sorted by file type and listed in their full route for you to track. You can decide which way to clean these files - either by putting them in to Trash or deleting them permanently.

Untuk download gratis di Apps Store silahkan KLIK DISINI!


2. Bandwidth+


• Track your Wi-Fi hotspot usage.
• Zero configuration required. It just works.

Bandwidth+ is a simple app so only tracks the network usage on the Mac it is running on. If you are tethered to an iPhone then it will count the usage while tethered.

At the moment local network traffic is not ignored so Time Capsule backups are counted. A future version will be smarter and ignore Time Capsule data.

Untuk download gratis di Apps Store silahkan  KLIK DISINI!

How to create a bootable macOS Sierra installer drive

Apple uses its App Store of distribute its software, like new Mac operating systems. It’s convenient, but sometimes it can take a while for a download to finish. And if you have multiple Macs, it’s inefficient to download the new OS to each and every Mac.


That’s why I like to make a bootable external drive for the sole purpose of installing the Mac OS. When I need to tend to a bunch of Macs, it’s much faster to use a bootable drive instead of going to each Mac, launching the App Store, searching for the operating system, downloading it (after entering my Apple ID), and then running the installer.
You can create a bootable USB flash drive with the macOS Sierra installer that’s now available. The installer software will take up nearly 5GB of storage space. Here’s how to create a bootable macOS Sierra installer drive.Download the macOS Sierra installer
Launch the App Store app, then look for macOS Sierra in the store. (Here’s a link.) Click on the Download button, and your Mac will download the installer to your Application folder. If it automatically launches after download, quit the installer.
If you’ve already upgraded your Mac to Sierra, the installer is removed from the Applications folder. You can download it again if you go to Purchased in the App Store. Look for macOS Sierra in the list of apps that you’ve bought, and click on the Download button. If it automatically launches after download, quit the installer.

Get an external drive

Don’t worry if the drive isn’t formatted for the Mac. The drive will be reformatted automatically as part of the process. Change the name of your drive to Untitled; you need to do this for the steps below. Minimum 8GB of USB drive is enough for Sierra Installer.

The quick and easy way

The process detailed below involves the Terminal. If your really don’t want to use Terminal, there are a couple of free apps you can use.

  • Install Disk Creator is a straightforward way to create a boot disk. I was able to make a macOS Sierra external USB boot disk in a few minutes, and the installation worked without a hitch. Also works with older versions of OS X.
  • Diskmaker X is a popular app. As of this writing, it supports El Capitan and older versions of OS X. I tried a workaround to see if I could use DiskMaker X to create a Sierra boot disk, and I got error messages. Keep an eye on DiskMaker X to see if/when it will support macOS Sierra.

Use the Terminal to create a boot disk


So you have your external drive, and the Sierra beta installer is in place. Now you’re going to use Terminal to create a boot drive. If you’ve never used Terminal before, don’t worry. This is pretty easy.
Here are the steps to create a macOS Sierra beta boot disk. (Apple also has these instructions.)
  1. Connect the external drive to your Mac. (In the Terminal command you will use, I use Untitled to represent your external drive. If your drive is named something else, you need to change Untitled to the name of your drive.)
  2. Launch Terminal (/Applications/Utilities/Terminal.app).
  3. Copy the following:
    sudo /Applications/Install\ macOS\ Sierra.app/Contents/Resources/createinstallmedia --volume /Volumes/Untitled --applicationpath /Applications/Install\ macOS\ Sierra.app
  4. Go back to Terminal and paste the copied code at the prompt.
  5. Terminal will ask for a password. This is your user password. Terminal doesn’t display characters when you type it in. Hit Return.
  6. Terminal will tell you that it will erase your drive. To confirm that you want to continue, type Y and hit return.
  7. You’ll see that Terminal erases your drive. When that part is done, your Mac may ask you if you want to use the drive for Time Machine. Click Don’t Use.
  8. Terminal will copy the installer file to your drive. This will take a few minutes.
  9. After copying, Terminal is done. You should see Terminal display a “Copy complete” and Done notice. You can quit Terminal and your drive is ready for use.

How to boot from the installer drive

  1. Plug your external drive into your Mac.
  2. Power up (or restart) your Mac. Press down on the Option key while the Mac boots.
  3. After a few moments, your Mac should display the Startup Manager, which will show you the available boot drives. Click on the external drive and hit Return. (You don’t need to select a network to proceed.)
  4. Your Mac will display an OS X Utilites window. If you want to install Sierra and leave the data intact, select Install OS X. If you want to start over and wipe out the data, you need to go into Disk Utility to reformat the internal drive first, and then install macOS Sierra.
Source: Macworld.com 
# # # #